Removing wires from automotive connectors may seem intimidating, but with the right tools, knowledge, and patience, it’s a straightforward process. Whether you’re performing routine maintenance, replacing a faulty wire, or troubleshooting a connector issue, learning how to properly remove wires protects your components and ensures reliable reconnections.
Introduction: Why Wire Removal Matters
Common Reasons for Removing Wires from Connectors
Automotive connectors are the backbone of a vehicle’s electrical system. Over time, you may need to remove wires to:
-
Replace a damaged terminal or corroded wire
-
Re-pin a connector during harness repairs
-
Swap or upgrade electrical components
-
Diagnose intermittent electrical faults
Proper removal helps preserve connector integrity and avoids unnecessary replacements.
How Proper Removal Prevents Damage and Extends Connector Life
Connectors are precision-engineered for tight, reliable fits. Forcing wires or using incorrect tools can deform terminals, weaken locking mechanisms, and cause loose electrical contacts — leading to voltage drops or signal loss. Following a proper removal process ensures connectors maintain their designed performance and lifespan.
Understanding Connector Construction
Housing, Terminals, and Locks Explained
Each automotive connector consists of:
-
Housing: The outer shell that protects the terminals and aligns them during connection.
-
Terminals: The conductive pins or sockets that transmit current or signals.
-
Seals: Rubber or silicone inserts that block out moisture, dirt, and vibration.
-
Locks: Retention devices such as TPA (Terminal Position Assurance) or CPA (Connector Position Assurance) mechanisms that prevent accidental disconnection.
How Terminals Are Secured Inside Connectors
Terminals are held in place by small locking tabs or spring tangs inside the housing. These prevent back-out under vibration or heat. During wire removal, these locks must be released — not forced — using a compatible extraction tool designed for your connector type.
Tools You’ll Need for Safe Wire Removal
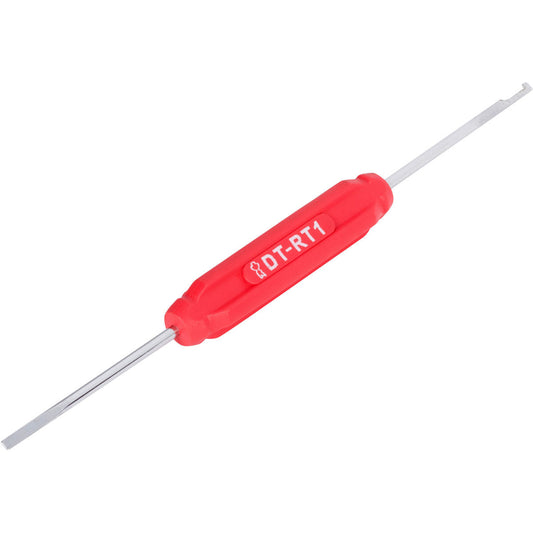
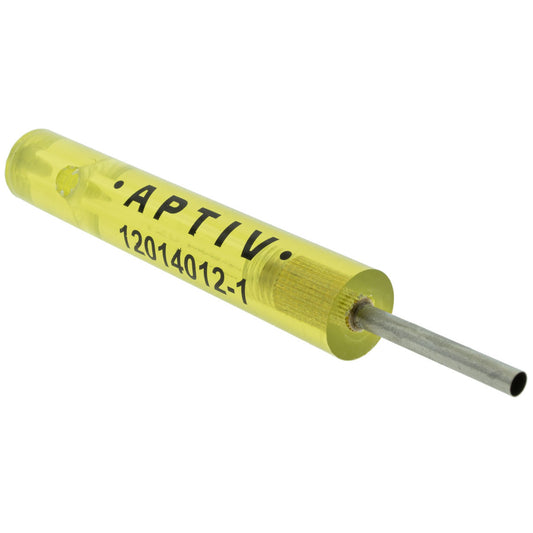
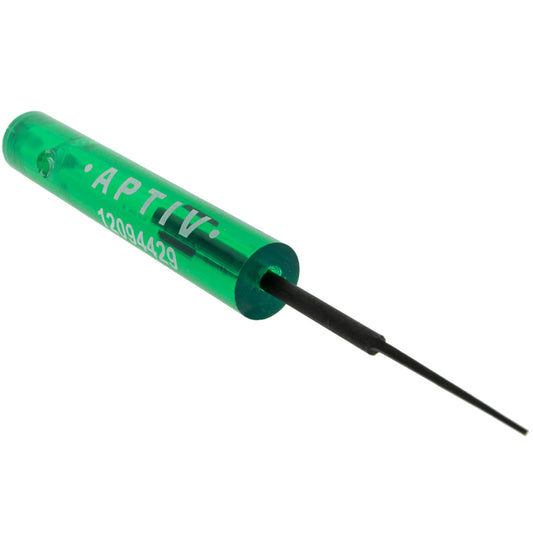
Terminal Extraction Tools
These are purpose-built to release terminal locks without causing damage. Each type corresponds to specific terminal shapes — round, flat, or square — and is often color-coded for size identification.
Small Picks or Screwdrivers (When Appropriate)
In tight spaces or older connectors, a small pick or precision flathead screwdriver can assist. However, these should only be used if you’re experienced and cautious, as improvised tools can easily deform locking tabs.
Crimp and Seal Inspection Tools
After removal, inspect terminals and seals with a magnifier or crimp inspection tool. Proper crimping ensures mechanical strength and electrical continuity.
Connector-Specific Removal Tools from CCK
Custom Connector Kits (CCK) offers complete wire removal and harness repair toolkits — including Deutsch, Weather-Pack, Metri-Pack, and Delphi compatible extraction tools. Kits include multiple pin sizes, removal tools, and sealing gaskets to support virtually every automotive connector repair.
Shop CCK Extraction Tools → customconnectorkits.com
Step-by-Step Guide: Removing Wires from Automotive Connectors
Step 1: Disconnect Power and Access the Connector
Always disconnect the vehicle’s battery before handling electrical components. This prevents shorts and protects sensitive electronics.
Step 2: Identify the Locking Mechanism (TPA, CPA, or Wedgelock)
Examine the connector to determine which locking system it uses:
-
TPA (Terminal Position Assurance): Ensures terminals are fully seated.
-
CPA (Connector Position Assurance): Prevents accidental disconnection once mated.
-
Wedgelock: A small removable insert that reinforces terminal retention.
Step 3: Release or Remove the Locking Device
Using a small pick or terminal tool, gently lift or slide out the locking piece. Do not pry aggressively — most locks release with minimal force.
Step 4: Insert the Extraction Tool to Release the Terminal
Insert the correct-size extraction tool into the terminal cavity. Push until you feel resistance, then lightly press to disengage the terminal’s locking tab from the housing.
Step 5: Gently Pull the Wire Out of the Connector Housing
Once the tab is released, gently pull the wire backward from the rear of the connector. Never yank or twist — doing so could bend or break the terminal.
Step 6: Inspect the Terminal and Housing for Reuse
After removal, inspect both the terminal and housing:
-
Look for corrosion, cracks, or bent locking tabs
-
Check seals for wear or flattening
-
Replace any damaged components before reassembly
Tips for Avoiding Common Mistakes
Never Force the Wire or Tool
If resistance is high, the lock is likely still engaged. Forcing it can permanently damage the connector or tab.
Don’t Skip Unlocking the TPA or Wedgelock
Many connectors, such as Delphi GT Series or Deutsch DT Series, include secondary locks. Always remove or disengage these before attempting extraction.
Inspect for Bent Tabs or Damaged Seals
A bent terminal tab may prevent re-insertion or cause poor contact. Damaged seals allow moisture intrusion — one of the most common causes of electrical failure.
When to Replace vs Reuse Connectors
How to Identify a Damaged Terminal or Housing
If terminals appear discolored, pitted, or loose, they may no longer make reliable contact. Similarly, if the connector housing has cracked clips or warped cavities, replacement is recommended.
When Replacement Is the Safer Option
In critical circuits like sensors, fuel injectors, or lighting systems, even minor connector wear can cause intermittent issues. Replacement ensures long-term dependability.
How CCK Offers Replacement Parts and Tools
CCK provides OEM-compatible replacements from trusted brands including Deutsch, Delphi, and Metri-Pack, plus complete harness repair kits to help restore your connection to factory standards.
Explore Replacement Connectors → customconnectorkits.com/collections
Frequently Asked Questions (People Also Asked)
Can I remove wires without a terminal removal tool?
It’s possible, but not recommended. Using makeshift tools like paper clips or pins can deform or break terminal locks. A proper terminal extraction tool ensures smooth removal without damage.
What’s the difference between TPA and CPA locks?
-
TPA (Terminal Position Assurance) secures the terminal inside the connector to ensure proper seating.
-
CPA (Connector Position Assurance) secures the mated connectors together, preventing accidental disconnection.
Many connectors — like Delphi GT and Metri-Pack — include both for maximum reliability.
Can the same connector be reused after wire removal?
Yes, if neither the housing nor the terminal is damaged. Always inspect for bent tabs, corrosion, or degraded seals. If any are compromised, replace the affected parts using OEM-grade replacements.
Conclusion: Safe and Simple Wire Removal with the Right Tools
Removing wires from automotive connectors doesn’t have to be difficult. With the right tools, a steady hand, and attention to detail, you can service your electrical system without causing damage — extending the life of your connectors and ensuring optimal performance.
Shop Automotive Extraction Tools and Connector Kits at CCK
CustomConnectorKits.com — your trusted source for Deutsch, Delphi, Metri-Pack, and Weather-Pack connector solutions.